MPI
MPI 是一个定义了多个原语的消息传递接口,可以允许运行在集群中不同节点的多个进程可以互相通信,在 HPC 并行计算领域应用广泛。
Message Passing Interface (MPI) is a standardized and portable message-passing standard designed to function on parallel computing architectures. 1
Background
Programming Model
The need for MPI arises due to the increasing complexity of scientific simulations and the ever-increasing size of the data generated by them. As such simulations involve a large number of calculations, they require high computing power, which is typically provided by HPC clusters consisting of many interconnected nodes.
参考 MPI 教程中的介绍 2 ,我们可以看到 MPI 产生的背景:为了应对大规模数据和计算的问题,通过消息传递模型将计算分散到集群的各个节点中,而 MPI 就是为此定义的统一接口。
消息传递指用户必须通过显式地发送和接收消息来实现处理器间的数据交换。在这种并行编程中,每个控制流均有自己独立的地址空间,不同的控制流之间不能直接访问彼此的地址空间,必须通过 显式的消息传递 来实现。 这种编程方式是大规模并行处理机(MPP)和机群(Cluster)采用的主要编程方式。由于消息传递程序设计要求用户很好地分解问题,组织不同控制流间的数据交换,并行计算粒度大,特别适合于大规模可扩展并行算法。
回顾一下什么是消息传递模型?它其实只是指程序通过在进程间传递消息(消息可以理解成带有一些信息和数据的一个数据结构)来完成某些任务。在实践中,并发程序用这个模型去实现特别容易。举例来说,主进程(master process)可以通过对从进程(slave process)发送一个描述工作的消息来把这个工作分配给它。另一个例子就是一个并发的排序程序可以在当前进程中对当前进程可见的(我们称作本地的,locally)数据进行排序,然后把排好序的数据发送的邻居进程上面来进行合并的操作。几乎所有的并行程序可以使用消息传递模型来描述。
由于当时很多软件库都用到了这个消息传递模型,但是在定义上有些微小的差异,这些库的作者以及一些其他人为了解决这个问题就在 Supercomputing 1992 大会上定义了一个消息传递接口的标准,也就是 MPI。这个标准接口使得程序员写的并发程序可以在所有主流的并发框架中运行。并且允许他们可以使用当时已经在使用的一些流行库的特性和模型。
到 1994 年的时候,一个完整的接口标准定义好了(MPI-1)。我们要记住 MPI 只是一个接口的定义而已。然后需要程序员去根据不同的架构去实现这个接口。很幸运的是,仅仅一年之后,一个完整的 MPI 实现就已经出现了。在第一个实现之后,MPI 就被大量地使用在消息传递应用程序中,并且依然是写这类程序的标准(de-facto)。
在分布式中与 MPI 类似的不同范式包括 RPC,Distributed Shared Memory 等。关于它们的比较可以参考论文 Message Passing, Remote Procedure Calls and Distributed Shared Memory as Communication Paradigms for Distributed Systems3。
MPI Implementation
MPI 提出了这一系列为了解决进程间消息传递问题而存在的接口,在 MPI Forum4 可以看到 MPI 各个版本的文档(目前发布到了 4.0)。MPI 只是接口,它们需要一个实现。MPI 1.x 的最早期实现是 MPICH 5 ,MPICH 的开发与 MPI 规范的制订是同步进行的,因此 MPICH 最能反映 MPI 的变化和发展。
另一个使用广泛的一个实现是 OpenMPI 6 。既然 OpenMPI 是 MPI 的一种实现,那针对不同的原语,采用什么算法和数据结构来实现,是实现者的自由。我们应该可以轻易地想到,针对不同的情况(主要是消息的大小等),采用不同的算法会提高整体的性能。OpenMPI 也是这样做的。
Get Hands Dirty
了解完基础的背景知识之后,为了对 MPI 有一个更加具体的了解,我们将实际安装 MPI 并完成 MPI 的 Hello World。
MPI on single machine
在 MPI Tutorial 中介绍了 MPICH 的安装方法,本文主要使用 OpenMPI,参照 Horovod 的 Dockerfile,单机安装 OpenMPI 很简单:
|
|
MPI Cluster
MPI 一般运行在集群多节点环境,要求集群之间多个节点能够互相通信,可以 ssh,一般配置步骤如下7:
- Configure
hostsfile to communicate using hostnames instead of IP address. - Set up ssh: install ssh server and login to each other machine without password.
- Each machine should have the same program in the same path. For example, hello world should be in the same path in your cluster.
问题,OpenMPI 在启动的时候,多台机器是如何发现并建立连接的呢?
- 在 Open-MPI 启动的时候,可以指定
--hostfile或者--host去指定运行要运行任务的 IP 或 Hostname,这样 Open-MPI 就会试图通过 ssh 免秘钥的方式试图去链接对方机器,并执行一系列命令,主要是为了同步环境变量、当前路径以及下发启动命令; - 当然用户也可以通过其他方式给远程机器下发命令,这个可以通过环境变量
OMPI_MCA_plm_rsh_agent指定
这里我们通过阅读 kubeflow 的 mpi-operator 代码可以看到集群建立到底是怎么实现的。对每一个 MPIJob,其 launcher 都有一个 init-container kubectl-delivery,它会负责将本 MPIJob 的 所有 worker 地址写到 hostfile 中 和安装 kubectl。这里在 launcher Pod 里面安装 kubectl ,之后可以通过 kubectl 来给 Worker 发送 mpirun 的命令;
[!Note] kubectl-delivery 在后续版本被移除了,需要确定下是否还需要这部分
在 Kubernetes 集群中部署以下 MPIJob,可以看到对应的 launcher Pod 和 worker Pod,并且 Pod 之间已经配置好连接性。
|
|
在 /opt/kube/hosts 可以看到 hosts 文件,描述了各个 Pod 的实际地址:
|
|
在 MPIJob controller 中还会创建对应的 configmap,用于发现 hosts 和执行 ssh
|
|
在 查看 launcher Pod 的 manifest
|
|
|
|
[!Note]
- 这里要进一步看下
rsh_agent和hostfile的原理- 关于
discover_host.sh则是和 horovod 分布式训练有关,可以参考 云原生的弹性 AI 训练系列之一:基于 AllReduce 的弹性分布式训练实践
Hello world
参考上面的 MPI Operator 环境部署好之后,可以运行最基本的 Hello World 了。
|
|
你应该已经注意到搭建一个 MPI 程序的第一步是引入 #include <mpi.h> 这个头文件。然后 MPI 环境必须以以下代码来初始化:
|
|
在 MPI_Init 的过程中,所有 MPI 的全局变量或者内部变量都会被创建。举例来说,一个通讯器 communicator 会根据所有可用的进程被创建出来(进程是我们通过 mpi 运行时的参数指定的),然后每个进程会被分配独一无二的秩 rank。当前来说,MPI_Init 接受的两个参数是没有用处的,不过参数的位置保留着,可能以后的实现会需要用到。
在 MPI_Init 之后,有两个主要的函数被调用到了。这两个函数是几乎所有 MPI 程序都会用到的。
|
|
MPI_Comm_size 会返回 communicator 的大小,也就是 communicator 中可用的进程数量。在我们的例子中,MPI_COMM_WORLD(这个 communicator 是 MPI 帮我们生成的)这个变量包含了当前 MPI 任务中所有的进程,因此在我们的代码里的这个调用会返回所有的可用的进程数目。
|
|
MPI_Comm_rank 这个函数会返回 communicator 中当前进程的 rank。 communicator 中每个进程会以此得到一个从0开始递增的数字作为 rank 值。rank 值主要是用来指定发送或者接受信息时对应的进程。
|
|
MPI_Get_processor_name 会得到当前进程实际跑的时候所在的处理器名字。
代码中最后一个调用是:
|
|
MPI_Finalize 是用来清理 MPI 环境的。这个调用之后就没有 MPI 函数可以被调用了。
接下来需要在每一个 Pod 的相同路径编译 hello.c
|
|
接下来通过 mpirun 命令可以并行运行 Hello World。
|
|
你可以通过指定 hostfile 来设置并发度,这里将 slots 设置为 2
the
slotsparameter specifies the number of processors available on each node
|
|
MPI Primitives
point-to-point communication
端到端通信部分主要实现了从一个进程到另一个进程的通信,核心功能由两个原语提供:
|
|
发送和接收是 MPI 里面两个基础的概念。MPI 里面几乎所有单个的方法都可以使用基础的发送和接收 API 来实现。
具体内容请参考 MPI 教程:MPI Send and Receive8。
collective communication
集合通讯是建立在端到端通信的基础上,在一组进程内的通讯原语。这部分参考自以下材料:
- MPI 教程:广播以及集体 (collective)通信9 和MPI 教程:MPI Scatter, Gather, and Allgather10 从小白开始了解 MPI 的集合通信
- MPI Forum: MPI 4.0 Standard 的第六章 Collective Communication 11,介绍了 MPI 集合通信的详细定义和各种 Spec
- Wikipedia: Collective operation 12 有比较详细和配图和数学上的解释
Collective Communication 可以分为以下几种类型13:
- Barrier Synchronization – Blocks until all processes have reached a synchronization point
- Data Movement (or Global Communication) – Broadcast, Scatters, Gather, All to All transmission of data across the communicator.
- Collective Operations (or Global Reduction) – One process from the communicator collects data from each process and performs an operation on that data to compute a result.
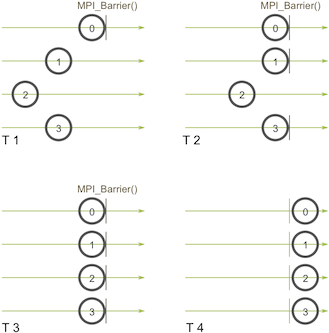
Barrier Synchronization
MPI_Barrier blocks until all process have reached this routine.
|
|
Brodcast
|
|

正如在 MPI Brodcast and Collective Communication 中提到的,Broadcast 可以由多种算法来实现,在 Wikipedia: Broadcast 中介绍了多种算法:
比如 Binomial Tree Broadcast
比如 Pipeline Broadcast

其他的还有更多的算法,具体可以参看 Wikipedia 14 。
Gather
The gather communication pattern is used to store data from all processing units on a single processing unit.

|
|

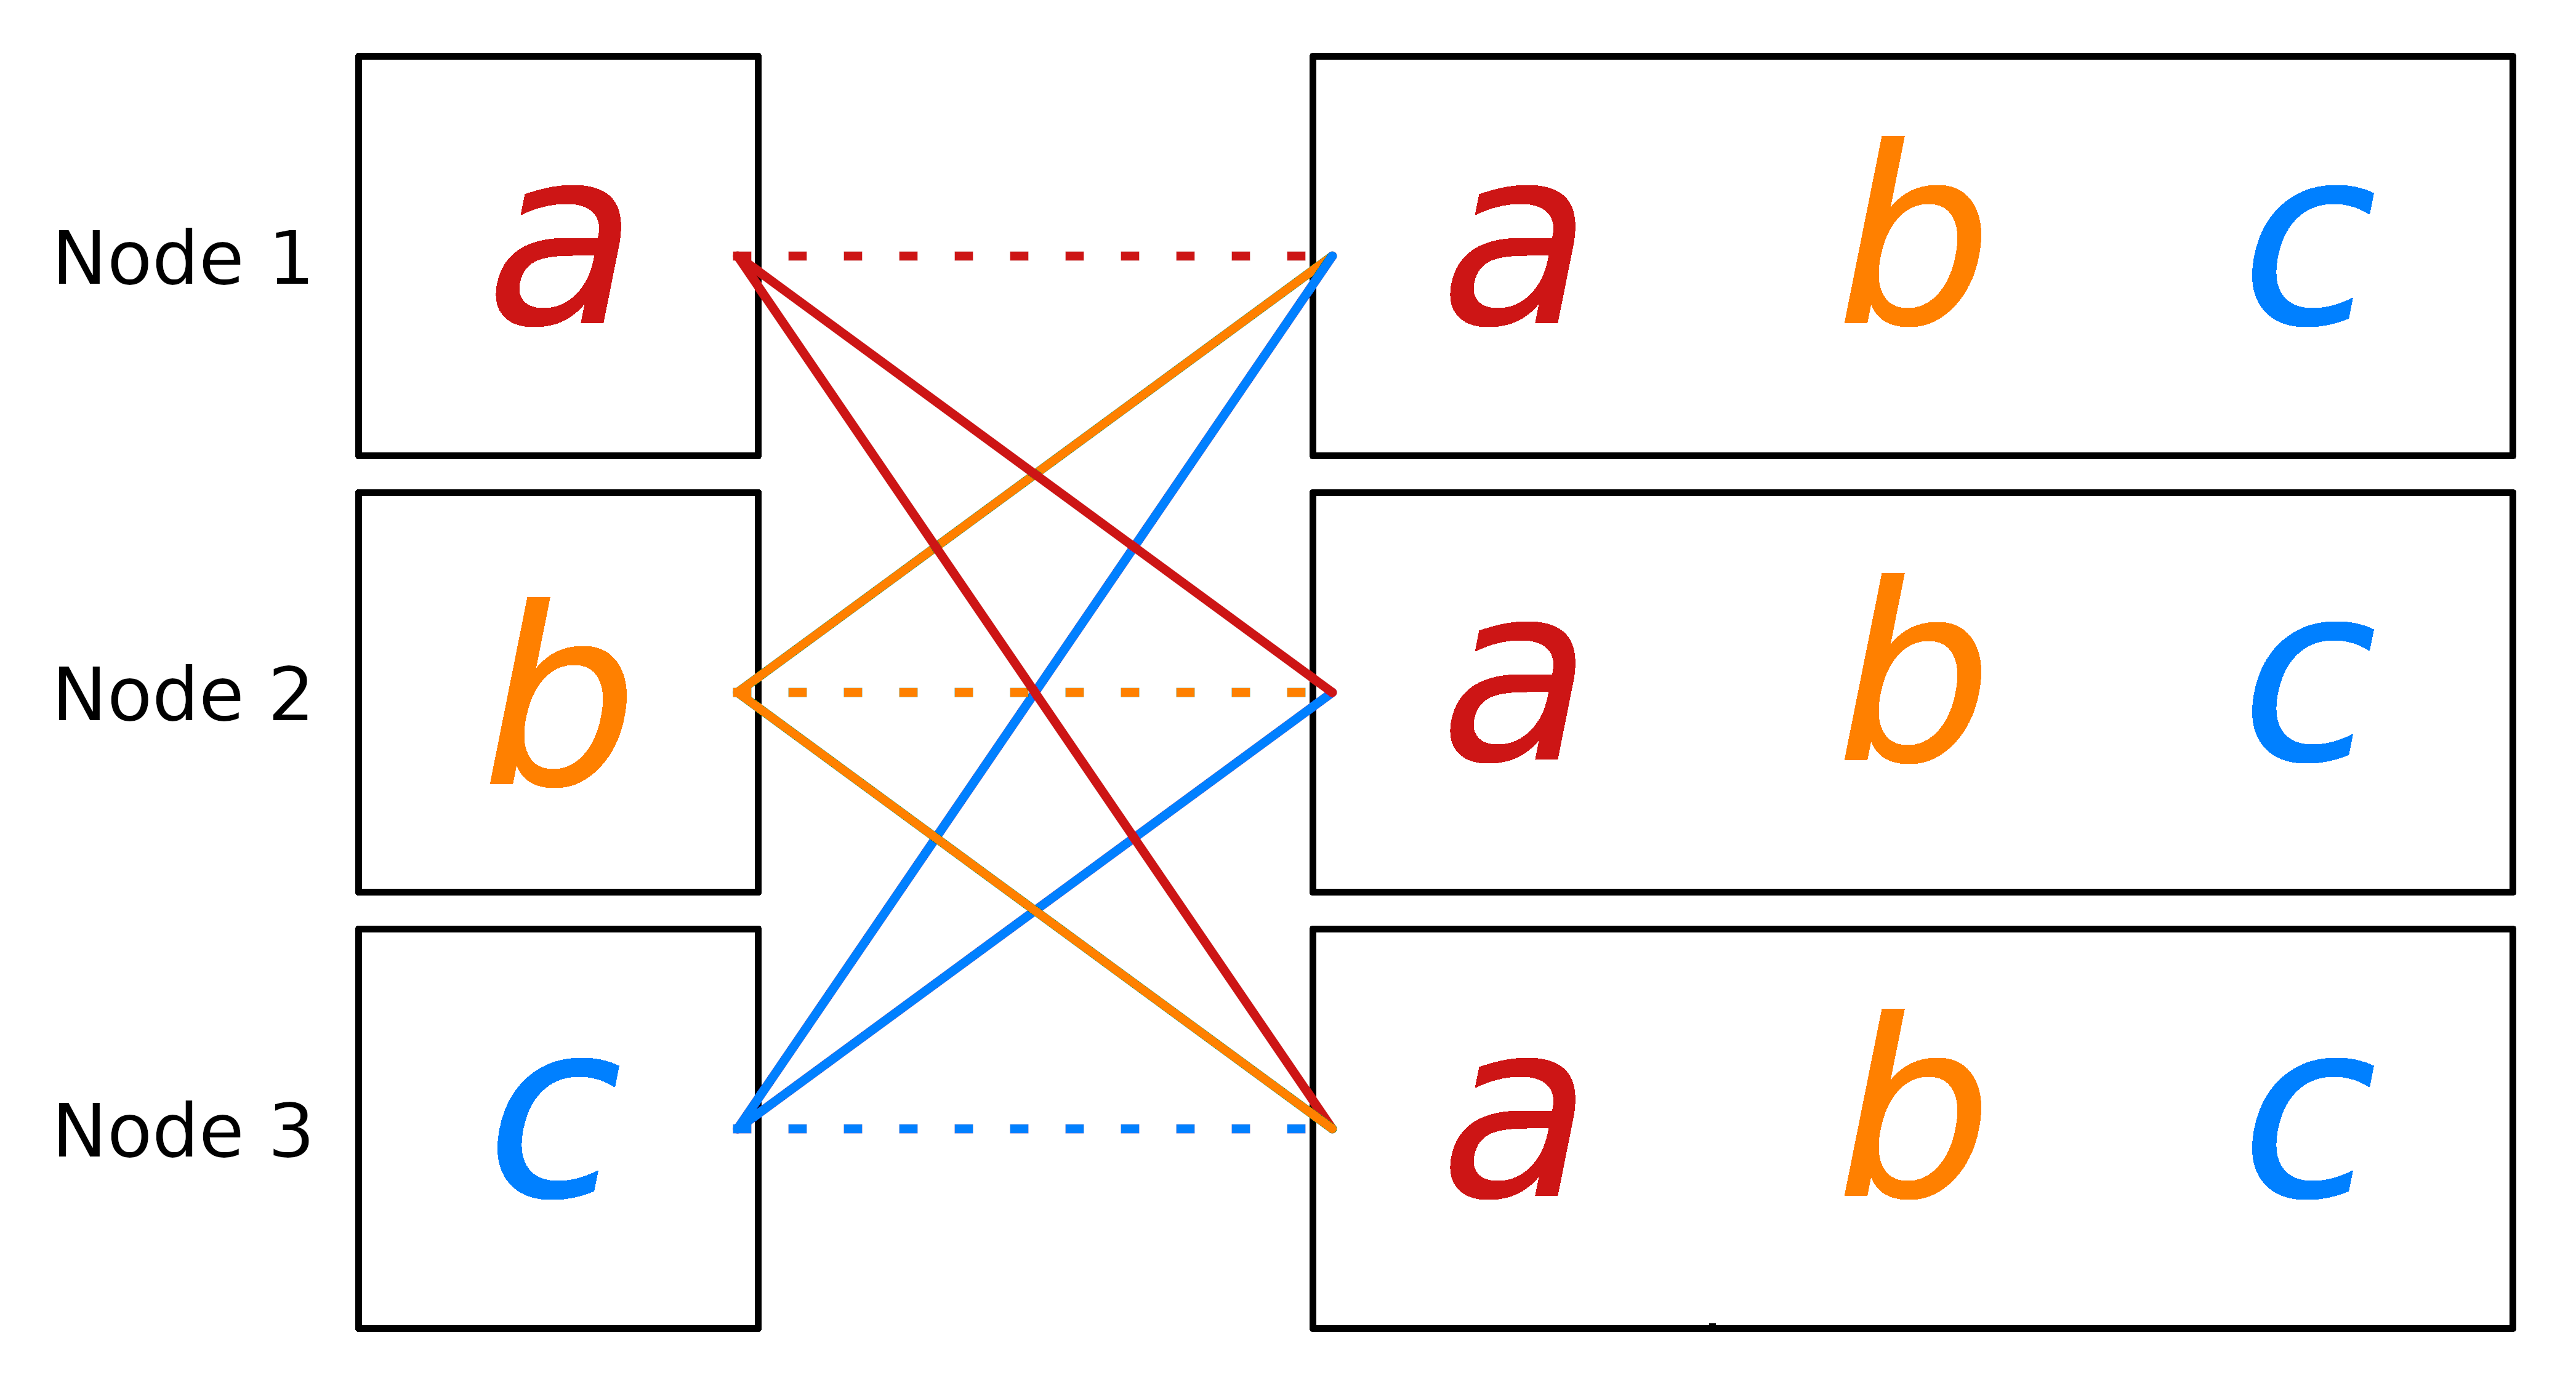
AllGather
The all-gather communication pattern is used to collect data from all processing units and to store the collected data on all processing units
Scatter
The scatter communication pattern is used to distribute data from one processing unit to all the processing units

|
|

Reduce
Information flow of Reduce operation performed on three nodes. $f$ is the associative operator and $\alpha$ is the result of the reduction.

|
|

和 Broadcast 一样,Reduce 也有基于 Tree 和 Pipeline 的优化算法,具体可以参考 Wikipedia: Reduce 15
AllReduce
The all-reduce pattern is used if the result of a reduce operation must be distributed to all processing units.

|
|

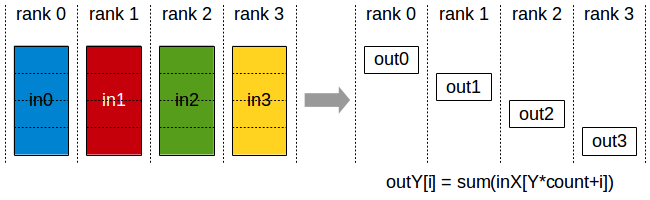
ReduceScatter
MPI_Reduce_scatter combines values and scatters the results. The illustration is using the operation MPI_SUM.

Scan
MPI_Scan computes the scan (partial reductions) of data on a collection of processes. The illustration is using the operation MPI_SUM.

|
|

All-to-All
all-to-all (also known as index operation or total exchange) is a collective operation where each processor sends an individual message to every other processor.

Commands
在 OpenMPI 中可以有对于 mpirun 命令的详细介绍16,这里主要介绍一些关键参数。
|
|
References
-
No backlinks found.