Linux Namespace 机制提供一种资源隔离方案,为实现基于容器的虚拟化技术提供了很好的基础,该机制类似于 Solaris 中的 zone 或 FreeBSD 中的 jail。LXC 就是利用这一特性实现了资源的隔离,不同 Container 内的进程属于不同的 Namespace,彼此透明,互不干扰。与 chroot 通过修改根目录把用户 jail 到一个特定目录下实现文件系统的隔离不同,Linux Namespace 在此基础上,提供了对 UTS、IPC、mount、PID、network、User 等的隔离机制。本文所有示例代码可以在我的 Github 中找到。

内核命名空间描述

在 Linux 内核中提供了多个 namespace,其中包括 fs (mount)、uts、network、sysv ipc 等。一个进程可以属于多个 namesapce,既然 namespace 和进程相关,那么在 task_struct 结构体中就会包含和 namespace 相关联的变量。在 task_struct结构中有一个指向 namespace 结构体的指针 nsproxy。

1
2
3
4
5
6
7
struct task_struct
{
/* ... */
/* namespaces */
    struct nsproxy *nsproxy;
/* ... */
}

再看一下nsproxy是如何定义的,在 include/linux/nsproxy.h 文件中,这里一共定义了 5 个各自的命名空间结构体,在该结构体中定义了 5 个指向各个类型 namespace 的指针,由于多个进程可以使用同一个 namespace,所以 nsproxy 可以共享使用,count 字段是该结构的引用计数。

 1
 2
 3
 4
 5
 6
 7
 8
 9
10
11
12
13
14
15
16
17
18
19
20
21
22
23
24
25
/*
 * A structure to contain pointers to all per-process
 * namespaces - fs (mount), uts, network, sysvipc, etc.
 *
 * The pid namespace is an exception -- it's accessed using
 * task_active_pid_ns.  The pid namespace here is the
 * namespace that children will use.
 *
 * 'count' is the number of tasks holding a reference.
 * The count for each namespace, then, will be the number
 * of nsproxies pointing to it, not the number of tasks.
 *
 * The nsproxy is shared by tasks which share all namespaces.
 * As soon as a single namespace is cloned or unshared, the
 * nsproxy is copied.
 */
struct nsproxy {
	atomic_t count;
	struct uts_namespace *uts_ns;    // 包含了运行内核的名称、版本、底层体系结构类型等信息, UTS是UNIX Timesharing System的简称
	struct ipc_namespace *ipc_ns;    // 所有与进程间通信(IPC)有关的信息
	struct mnt_namespace *mnt_ns;    // 已经装载的文件系统的视图
	struct pid_namespace *pid_ns_for_children;  // 有关进程ID的信息
	struct net 	     *net_ns;        // 包含所有网络相关的命名空间参数
	struct cgroup_namespace *cgroup_ns;
};

系统中有一个默认的nsproxyinit_nsproxy,该结构在 task 初始化是也会被初始,定义在 init/init_task.c

1
2
3
4
5
6
#define INIT_TASK(tsk)  \
{
/* ... */
         .nsproxy   = &init_nsproxy,
/* ... */
}

其中 init_nsproxy 的定义为:

 1
 2
 3
 4
 5
 6
 7
 8
 9
10
11
12
13
14
15
struct nsproxy init_nsproxy = {
	.count			= ATOMIC_INIT(1),
	.uts_ns			= &init_uts_ns,
#if defined(CONFIG_POSIX_MQUEUE) || defined(CONFIG_SYSVIPC)
	.ipc_ns			= &init_ipc_ns,
#endif
	.mnt_ns			= NULL,
	.pid_ns_for_children	= &init_pid_ns,
#ifdef CONFIG_NET
	.net_ns			= &init_net,
#endif
#ifdef CONFIG_CGROUPS
	.cgroup_ns		= &init_cgroup_ns,
#endif
};

对于 .mnt_ns 没有进行初始化,其余的 namespace 都进行了系统默认初始

命名空间的创建

Linux Namespace 有如下种类,官方文档在这里 Namespace in Operation

分类 系统调用参数 相关内核版本 作用
Mount namespaces CLONE_NEWNS Linux 2.4.19 使进程有一个独立的挂载文件系统
UTS namespaces CLONE_NEWUTS Linux 2.6.19 使进程有一个独立的 hostname 和 domainname
IPC namespaces CLONE_NEWIPC Linux 2.6.19 使进程有一个独立的 ipc,包括消息队列,共享内存和信号量
PID namespaces CLONE_NEWPID Linux 2.6.24 使进程有一个独立的 pid 空间
Network namespaces CLONE_NEWNET 始于 Linux 2.6.24 完成于 Linux 2.6.29 使进程有一个独立的网络栈
User namespaces CLONE_NEWUSER 始于 Linux 2.6.23 完成于 Linux 3.8) 是进程有一个独立的 user 空间
Cgroup namespaces CLONE_NEWCGROUP 始于 Linux 4.6 使进程有一个独立的 cgroup 控制组

Linux 的每个进程都具有命名空间,可以在/proc/PID/ns 目录中看到命名空间的文件描述符。

 1
 2
 3
 4
 5
 6
 7
 8
 9
10
[root@staight ns]# pwd
/proc/1/ns
[root@staight ns]# ll
total 0
lrwxrwxrwx 1 root root 0 Sep 23 19:53 ipc -> ipc:[4026531839]
lrwxrwxrwx 1 root root 0 Sep 23 19:53 mnt -> mnt:[4026531840]
lrwxrwxrwx 1 root root 0 Sep 23 19:53 net -> net:[4026531956]
lrwxrwxrwx 1 root root 0 Sep 23 19:53 pid -> pid:[4026531836]
lrwxrwxrwx 1 root root 0 Sep 23 19:53 user -> user:[4026531837]
lrwxrwxrwx 1 root root 0 Sep 23 19:53 uts -> uts:[4026531838]

主要是三个系统调用

  • clone() – 实现线程的系统调用,用来创建一个新的进程,并可以通过设计上述参数达到隔离。
  • unshare() – 使某进程脱离某个 namespace
  • setns() – 把某进程加入到某个 namespace

下面还是让我们来看一些示例(以下的测试程序最好在 Linux 内核为 3.8 以上的版本中运行,我用的是 ubuntu 14.04)。

clone()系统调用

clone 的语法:

1
2
3
4
5
6
#define _GNU_SOURCE
#include <sched.h>

int clone(int (*fn)(void *), void *child_stack,
        int flags, void *arg, ...
        /* pid_t *ptid, void *newtls, pid_t *ctid */ );

其中 flags 即可指定命名空间,使用示例:

1
pid = clone(childFunc, stackTop, CLONE_NEWUTS | SIGCHLD, argv[1]);

首先,我们来看一下一个最简单的 clone()系统调用的示例:

 1
 2
 3
 4
 5
 6
 7
 8
 9
10
11
12
13
14
15
16
17
18
19
20
21
22
23
24
25
26
27
28
29
30
31
32
33
34
35
36
#define _GNU_SOURCE
#include <sys/types.h>
#include <sys/wait.h>
#include <stdio.h>
#include <sched.h>
#include <signal.h>
#include <unistd.h>

/* 定义一个给 clone 用的栈,栈大小1M */
#define STACK_SIZE (1024 * 1024)
static char container_stack[STACK_SIZE];

char* const container_args[] = {
    "/bin/bash",
    NULL
};

int container_main(void* arg)
{
    printf("Container - inside the container!\n");
    /* 直接执行一个shell,以便我们观察这个进程空间里的资源是否被隔离了 */
    execv(container_args[0], container_args);
    printf("Something's wrong!\n");
    return 1;
}

int main()
{
    printf("Parent - start a container!\n");
    /* 调用clone函数,其中传出一个函数,还有一个栈空间的(为什么传尾指针,因为栈是反着的) */
    int container_pid = clone(container_main, container_stack+STACK_SIZE, SIGCHLD, NULL);
    /* 等待子进程结束 */
    waitpid(container_pid, NULL, 0);
    printf("Parent - container stopped!\n");
    return 0;
}

从上面的程序,我们可以看到,这和 pthread 基本上是一样的玩法。但是,对于上面的程序,父子进程的进程空间是没有什么差别的,父进程能访问到的子进程也能。

1
2
3
4
$ gcc clone.c -o clone
$ ./clone
Parent - start a container!
Container - inside the container!

下面, 让我们来看几个例子看看,Linux 的 Namespace 是什么样的。

UTS Namespace

下面的代码,我略去了上面那些头文件和数据结构的定义,只有最重要的部分。

 1
 2
 3
 4
 5
 6
 7
 8
 9
10
11
12
13
14
15
16
17
18
int container_main(void* arg)
{
    printf("Container - inside the container!\n");
    sethostname("cosmos", 7); /* 设置hostname */
    execv(container_args[0], container_args);
    printf("Something's wrong!\n");
    return 1;
}

int main()
{
    printf("Parent - start a container!\n");
    int container_pid = clone(container_main, container_stack+STACK_SIZE,
            CLONE_NEWUTS | SIGCHLD, NULL); /*启用CLONE_NEWUTS Namespace隔离 */
    waitpid(container_pid, NULL, 0);
    printf("Parent - container stopped!\n");
    return 0;
}

运行上面的程序你会发现(需要 root 权限),子进程的 hostname 变成了 houmin。

1
2
3
4
5
6
ubuntu@VM-1-15-ubuntu:~/namespace$ gcc uts.c -o uts
ubuntu@VM-1-15-ubuntu:~/namespace$ sudo ./uts
Parent - start a container!
Container - inside the container!
root@cosmos:/home/ubuntu/namespace# hostname
cosmos

IPC Namespace

IPC 全称 Inter-Process Communication,是 Unix/Linux 下进程间通信的一种方式,IPC 有共享内存、信号量、消息队列等方法。所以,为了隔离,我们也需要把 IPC 给隔离开来,这样,只有在同一个 Namespace 下的进程才能相互通信。如果你熟悉 IPC 的原理的话,你会知道,IPC 需要有一个全局的 ID,即然是全局的,那么就意味着我们的 Namespace 需要对这个 ID 隔离,不能让别的 Namespace 的进程看到。

要启动 IPC 隔离,我们只需要在调用 clone 时加上 CLONE_NEWIPC 参数就可以了。

1
2
int container_pid = clone(container_main, container_stack+STACK_SIZE,
            CLONE_NEWUTS | CLONE_NEWIPC | SIGCHLD, NULL);

首先,我们先创建一个 IPC 的 Queue(如下所示,全局的 Queue ID 是 0)

1
2
3
4
5
6
7
ubuntu@VM-1-15-ubuntu:~$ ipcmk -Q
Message queue id: 0
ubuntu@VM-1-15-ubuntu:~$  ipcs -q

------ Message Queues --------
key        msqid      owner      perms      used-bytes   messages
0xc46166f5 0          ubuntu     644        0            0

如果我们运行没有 CLONE_NEWIPC 的程序,我们会看到,在子进程中还是能看到这个全启的 IPC Queue。

 1
 2
 3
 4
 5
 6
 7
 8
 9
10
11
12
13
ubuntu@VM-1-15-ubuntu:~/namespace$ gcc ipc.c -o ipc
ubuntu@VM-1-15-ubuntu:~/namespace$ sudo ./uts
Parent - start a container!
Container - inside the container!
root@cosmos:/home/ubuntu/namespace# ipcs -q

------ Message Queues --------
key        msqid      owner      perms      used-bytes   messages
0xc46166f5 0          ubuntu     644        0            0

root@cosmos:/home/ubuntu/namespace# exit
exit
Parent - container stopped!

但是,如果我们运行加上了 CLONE_NEWIPC 的程序,我们就会下面的结果:

1
2
3
4
5
6
7
8
9
ubuntu@VM-1-15-ubuntu:~/namespace$ sudo ./ipc
Parent - start a container!
Container - inside the container!
root@cosmos:/home/ubuntu/namespace# ipcs -q

------ Message Queues --------
key        msqid      owner      perms      used-bytes   messages

root@cosmos:/home/ubuntu/namespace#

我们可以看到 IPC 已经被隔离了。

PID Namespace

我们继续修改上面的程序:

 1
 2
 3
 4
 5
 6
 7
 8
 9
10
11
12
13
14
15
16
17
18
19
20
int container_main(void* arg)
{
    /* 查看子进程的PID,我们可以看到其输出子进程的 pid 为 1 */
    printf("Container [%5d] - inside the container!\n", getpid());
    sethostname("cosmos", 7);
    execv(container_args[0], container_args);
    printf("Something's wrong!\n");
    return 1;
}

int main()
{
    printf("Parent [%5d] - start a container!\n", getpid());
    /*启用PID namespace - CLONE_NEWPID*/
    int container_pid = clone(container_main, container_stack+STACK_SIZE,
            CLONE_NEWUTS | CLONE_NEWPID | SIGCHLD, NULL);
    waitpid(container_pid, NULL, 0);
    printf("Parent - container stopped!\n");
    return 0;
}

运行结果如下(我们可以看到,子进程的 pid 是 1 了):

1
2
3
4
5
6
ubuntu@VM-1-15-ubuntu:~/namespace$ gcc pid.c -o pid
ubuntu@VM-1-15-ubuntu:~/namespace$ sudo ./pid
Parent [147665] - start a container!
Container [    1] - inside the container!
root@cosmos:/home/ubuntu/namespace# echo $$
1

你可能会问,PID 为 1 有个毛用啊?我们知道,在传统的 UNIX 系统中,PID 为 1 的进程是 init,地位非常特殊。他作为所有进程的父进程,有很多特权(比如:屏蔽信号等),另外,其还会为检查所有进程的状态,我们知道,如果某个子进程脱离了父进程(父进程没有 wait 它),那么 init 就会负责回收资源并结束这个子进程。所以,要做到进程空间的隔离,首先要创建出 PID 为 1 的进程,最好就像 chroot 那样,把子进程的 PID 在容器内变成 1。

但是,我们会发现,在子进程的 shell 里输入 ps, top 等命令,我们还是可以看得到所有进程。说明并没有完全隔离。这是因为,像 ps, top 这些命令会去读/proc 文件系统,所以,因为/proc 文件系统在父进程和子进程都是一样的,所以这些命令显示的东西都是一样的。

所以,我们还需要对文件系统进行隔离。

Mount Namespace

下面的例程中,我们在启用了 mount namespace 并在子进程中重新 mount 了/proc 文件系统。

 1
 2
 3
 4
 5
 6
 7
 8
 9
10
11
12
13
14
15
16
17
18
19
20
21
int container_main(void* arg)
{
    printf("Container [%5d] - inside the container!\n", getpid());
    sethostname("container",10);
    /* 重新mount proc文件系统到 /proc下 */
    system("mount -t proc proc /proc");
    execv(container_args[0], container_args);
    printf("Something's wrong!\n");
    return 1;
}

int main()
{
    printf("Parent [%5d] - start a container!\n", getpid());
    /* 启用Mount Namespace - 增加CLONE_NEWNS参数 */
    int container_pid = clone(container_main, container_stack+STACK_SIZE,
            CLONE_NEWUTS | CLONE_NEWPID | CLONE_NEWNS | SIGCHLD, NULL);
    waitpid(container_pid, NULL, 0);
    printf("Parent - container stopped!\n");
    return 0;
}

运行结果如下:

1
2
3
4
5
6
7
8
ubuntu@VM-1-15-ubuntu:~/namespace$ gcc mnt.c -o mnt
ubuntu@VM-1-15-ubuntu:~/namespace$ sudo ./mnt
Parent [150192] - start a container!
Container [    1] - inside the container!
root@cosmos:/home/ubuntu/namespace# ps -elf
F S UID          PID    PPID  C PRI  NI ADDR SZ WCHAN  STIME TTY          TIME CMD
4 S root           1       0  0  80   0 -  1809 do_wai 20:50 pts/0    00:00:00 /bin/bash
0 R root          13       1  0  80   0 -  2219 -      20:51 pts/0    00:00:00 ps -elf

上面,我们可以看到只有两个进程 ,而且 pid=1 的进程是我们的/bin/bash。我们还可以看到/proc 目录下也干净了很多:

1
2
3
4
5
6
7
8
9
root@cosmos:/home/ubuntu/namespace# ls /proc/
1          cpuinfo      filesystems  keys         mdstat        partitions   stat           uptime
14         crypto       fs           key-users    meminfo       pressure     swaps          version
acpi       devices      interrupts   kmsg         misc          sched_debug  sys            version_signature
buddyinfo  diskstats    iomem        kpagecgroup  modules       schedstat    sysrq-trigger  vmallocinfo
bus        dma          ioports      kpagecount   mounts        scsi         sysvipc        vmstat
cgroups    driver       irq          kpageflags   mtrr          self         thread-self    zoneinfo
cmdline    execdomains  kallsyms     loadavg      net           slabinfo     timer_list
consoles   fb           kcore        locks        pagetypeinfo  softirqs     tty

下图,我们也可以看到在子进程中的 top 命令只看得到两个进程了。

1
2
3
4
5
6
7
8
9
top - 20:51:32 up 12 days,  4:37,  2 users,  load average: 0.20, 0.14, 0.09
Tasks:   2 total,   1 running,   1 sleeping,   0 stopped,   0 zombie
%Cpu(s):  1.8 us,  0.9 sy,  0.0 ni, 94.8 id,  2.3 wa,  0.0 hi,  0.2 si,  0.0 st
MiB Mem :   7449.7 total,   3346.1 free,    683.4 used,   3420.2 buff/cache
MiB Swap:      0.0 total,      0.0 free,      0.0 used.   6480.8 avail Mem

    PID USER      PR  NI    VIRT    RES    SHR S  %CPU  %MEM     TIME+ COMMAND
      1 root      20   0    7236   3848   3256 S   0.0   0.1   0:00.00 bash
     12 root      20   0    9120   3676   3152 R   0.0   0.0   0:00.00 top

这里,多说一下。在通过 CLONE_NEWNS 创建 mount namespace 后,父进程会把自己的文件结构复制给子进程中。而子进程中新的 namespace 中的所有 mount 操作都只影响自身的文件系统,而不对外界产生任何影响。这样可以做到比较严格地隔离。

User Namespace

User Namespace 主要是用了 CLONE_NEWUSER 的参数。使用了这个参数后,内部看到的 UID 和 GID 已经与外部不同了,默认显示为 65534。那是因为容器找不到其真正的 UID 所以,设置上了最大的 UID(其设置定义在 /proc/sys/kernel/overflowuid)。

要把容器中的 uid 和真实系统的 uid 给映射在一起,需要修改 /proc/<pid>/uid_map/proc/<pid>/gid_map 这两个文件。这两个文件的格式为:

ID-inside-ns ID-outside-ns length

其中:

  • 第一个字段 ID-inside-ns 表示在容器显示的 UID 或 GID,
  • 第二个字段 ID-outside-ns 表示容器外映射的真实的 UID 或 GID。
  • 第三个字段表示映射的范围,一般填 1,表示一一对应。

比如,把真实的 uid=1000 映射成容器内的 uid=0

1
2
$ cat /proc/2465/uid_map
0       1000          1

再比如下面的示例:表示把 namespace 内部从 0 开始的 uid 映射到外部从 0 开始的 uid,其最大范围是无符号 32 位整形

1
2
$ cat /proc/$$/uid_map
0          0          4294967295

另外,需要注意的是:

  • 写这两个文件的进程需要这个 namespace 中的 CAP_SETUID (CAP_SETGID)权限(可参看Capabilities
  • 写入的进程必须是此 user namespace 的父或子的 user namespace 进程。
  • 另外需要满如下条件之一:
    • 父进程将 effective uid/gid 映射到子进程的 user namespace 中
    • 父进程如果有 CAP_SETUID/CAP_SETGID 权限,那么它将可以映射到父进程中的任一 uid/gid

这些规则看着都烦,我们来看程序吧:

  1
  2
  3
  4
  5
  6
  7
  8
  9
 10
 11
 12
 13
 14
 15
 16
 17
 18
 19
 20
 21
 22
 23
 24
 25
 26
 27
 28
 29
 30
 31
 32
 33
 34
 35
 36
 37
 38
 39
 40
 41
 42
 43
 44
 45
 46
 47
 48
 49
 50
 51
 52
 53
 54
 55
 56
 57
 58
 59
 60
 61
 62
 63
 64
 65
 66
 67
 68
 69
 70
 71
 72
 73
 74
 75
 76
 77
 78
 79
 80
 81
 82
 83
 84
 85
 86
 87
 88
 89
 90
 91
 92
 93
 94
 95
 96
 97
 98
 99
100
101
102
103
104
#define _GNU_SOURCE
#include <stdio.h>
#include <stdlib.h>
#include <sys/types.h>
#include <sys/wait.h>
#include <sys/mount.h>
#include <sys/capability.h>
#include <stdio.h>
#include <sched.h>
#include <signal.h>
#include <unistd.h>

#define STACK_SIZE (1024 * 1024)

static char container_stack[STACK_SIZE];
char* const container_args[] = {
    "/bin/bash",
    NULL
};

int pipefd[2];

void set_map(char* file, int inside_id, int outside_id, int len) {
    FILE* mapfd = fopen(file, "w");
    if (NULL == mapfd) {
        perror("open file error");
        return;
    }
    fprintf(mapfd, "%d %d %d", inside_id, outside_id, len);
    fclose(mapfd);
}

void set_uid_map(pid_t pid, int inside_id, int outside_id, int len) {
    char file[256];
    sprintf(file, "/proc/%d/uid_map", pid);
    set_map(file, inside_id, outside_id, len);
}

void set_gid_map(pid_t pid, int inside_id, int outside_id, int len) {
    char file[256];
    sprintf(file, "/proc/%d/gid_map", pid);
    set_map(file, inside_id, outside_id, len);
}

int container_main(void* arg)
{

    printf("Container [%5d] - inside the container!\n", getpid());

    printf("Container: eUID = %ld;  eGID = %ld, UID=%ld, GID=%ld\n",
            (long) geteuid(), (long) getegid(), (long) getuid(), (long) getgid());

    /* 等待父进程通知后再往下执行(进程间的同步) */
    char ch;
    close(pipefd[1]);
    read(pipefd[0], &ch, 1);

    printf("Container [%5d] - setup hostname!\n", getpid());
    //set hostname
    sethostname("cosmos", 7);

    //remount "/proc" to make sure the "top" and "ps" show container's information
    mount("proc", "/proc", "proc", 0, NULL);

    execv(container_args[0], container_args);
    printf("Something's wrong!\n");
    return 1;
}

int main()
{
    const int gid=getgid(), uid=getuid();

    printf("Parent: eUID = %ld;  eGID = %ld, UID=%ld, GID=%ld\n",
            (long) geteuid(), (long) getegid(), (long) getuid(), (long) getgid());

    pipe(pipefd);

    printf("Parent [%5d] - start a container!\n", getpid());

    int container_pid = clone(container_main, container_stack+STACK_SIZE,
            CLONE_NEWUTS | CLONE_NEWPID | CLONE_NEWNS | CLONE_NEWUSER | SIGCHLD, NULL);

    printf("Parent [%5d] - Container [%5d]!\n", getpid(), container_pid);

    //To map the uid/gid,
    //   we need edit the /proc/PID/uid_map (or /proc/PID/gid_map) in parent
    //The file format is
    //   ID-inside-ns   ID-outside-ns   length
    //if no mapping,
    //   the uid will be taken from /proc/sys/kernel/overflowuid
    //   the gid will be taken from /proc/sys/kernel/overflowgid
    set_uid_map(container_pid, 0, uid, 1);
    set_gid_map(container_pid, 0, gid, 1);

    printf("Parent [%5d] - user/group mapping done!\n", getpid());

    /* 通知子进程 */
    close(pipefd[1]);

    waitpid(container_pid, NULL, 0);
    printf("Parent - container stopped!\n");
    return 0;
}

上面的程序,我们用了一个 pipe 来对父子进程进行同步,为什么要这样做?因为子进程中有一个 execv 的系统调用,这个系统调用会把当前子进程的进程空间给全部覆盖掉,我们希望在 execv 之前就做好 user namespace 的 uid/gid 的映射,这样,execv 运行的 /bin/bash 就会因为我们设置了 uid 为 0 的 inside-uid 而变成 # 号的提示符。

整个程序的运行效果如下:

 1
 2
 3
 4
 5
 6
 7
 8
 9
10
11
ubuntu@VM-1-15-ubuntu:~/namespace$ gcc user.c -o user
ubuntu@VM-1-15-ubuntu:~/namespace$ sudo ./user
Parent: eUID = 0;  eGID = 0, UID=0, GID=0
Parent [154152] - start a container!
Parent [154152] - Container [154153]!
open file error: No such file or directory
Parent [154152] - user/group mapping done!
Container [    1] - inside the container!
Container: eUID = 65534;  eGID = 65534, UID=65534, GID=65534
Container [    1] - setup hostname!

虽然容器里是 root,但其实这个容器的/bin/bash 进程是以一个普通用户 hchen 来运行的。这样一来,我们容器的安全性会得到提高。

我们注意到,User Namespace 是以普通用户运行,但是别的 Namespace 需要 root 权限,那么,如果我要同时使用多个 Namespace,该怎么办呢?一般来说,我们先用一般用户创建 User Namespace,然后把这个一般用户映射成 root,在容器内用 root 来创建其它的 Namesapce。

Network Namespace

Network 的 Namespace 比较啰嗦。在 Linux 下,我们一般用 ip 命令创建 Network Namespace(Docker 的源码中,它没有用 ip 命令,而是自己实现了 ip 命令内的一些功能——是用了 Raw Socket 发些“奇怪”的数据,呵呵)。这里,我还是用 ip 命令讲解一下。

首先,我们先看个图,下面这个图基本上就是 Docker 在宿主机上的网络示意图(其中的物理网卡并不准确,因为 docker 可能会运行在一个 VM 中,所以,这里所谓的“物理网卡”其实也就是一个有可以路由的 IP 的网卡)

network.namespace
network.namespace

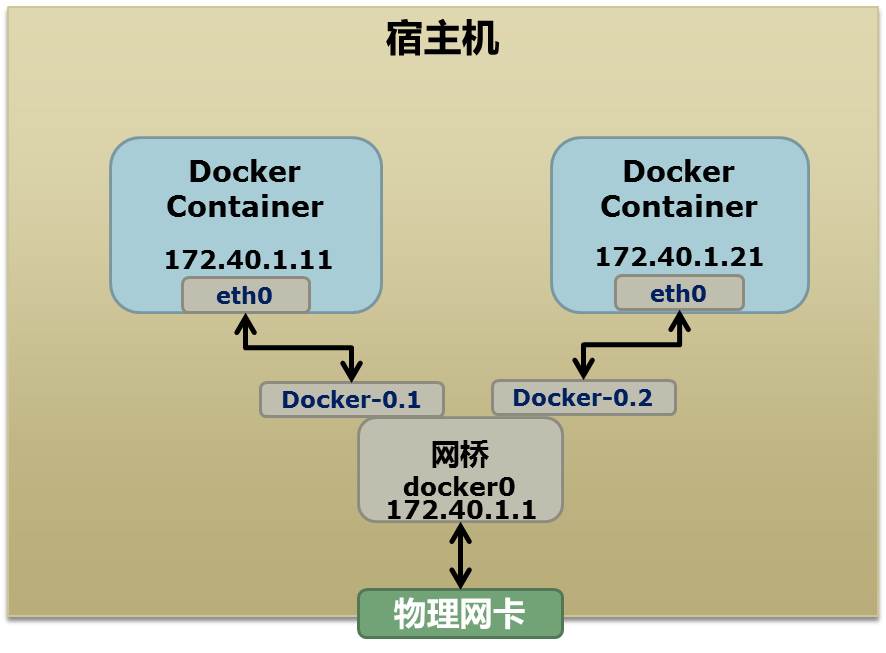
上图中,Docker 使用了一个私有网段,172.40.1.0,docker 还可能会使用 10.0.0.0 和 192.168.0.0 这两个私有网段,关键看你的路由表中是否配置了,如果没有配置,就会使用,如果你的路由表配置了所有私有网段,那么 docker 启动时就会出错了。

当你启动一个 Docker 容器后,你可以使用 ip link show 或 ip addr show 来查看当前宿主机的网络情况(我们可以看到有一个 docker0,还有一个 veth22a38e6 的虚拟网卡——给容器用的):

hchen@ubuntu:~$ ip link show
1: lo: <LOOPBACK,UP,LOWER_UP> mtu 65536 qdisc noqueue state ...
   link/loopback *00*:*00*:*00*:*00*:*00*:*00* brd *00*:*00*:*00*:*00*:*00*:*00*
2: eth0: <BROADCAST,MULTICAST,UP,LOWER_UP> mtu 1500 qdisc ...
   link/ether *00*:0c:29:b7:67:7d brd ff:ff:ff:ff:ff:ff
3: docker0: <BROADCAST,MULTICAST,UP,LOWER_UP> mtu 1500 ...
   link/ether 56:84:7a:fe:97:99 brd ff:ff:ff:ff:ff:ff
5: veth22a38e6: <BROADCAST,UP,LOWER_UP> mtu 1500 qdisc ...
   link/ether 8e:30:2a:ac:8c:d1 brd ff:ff:ff:ff:ff:ff

那么,要做成这个样子应该怎么办呢?我们来看一组命令:

 1
 2
 3
 4
 5
 6
 7
 8
 9
10
11
12
13
14
15
16
17
18
19
20
21
22
23
24
25
26
27
28
29
30
31
32
33
34
# 首先,我们先增加一个网桥lxcbr0,模仿docker0
brctl addbr lxcbr0
brctl stp lxcbr0 off
ifconfig lxcbr0 192.168.10.1/24 up #为网桥设置IP地址
# 接下来,我们要创建一个network namespace - ns1
# 增加一个namesapce 命令为 ns1 (使用ip netns add命令)
ip netns add ns1

# 激活namespace中的loopback,即127.0.0.1(使用ip netns exec ns1来操作ns1中的命令)
ip netns exec ns1   ip link set dev lo up

# 然后,我们需要增加一对虚拟网卡
# 增加一个pair虚拟网卡,注意其中的veth类型,其中一个网卡要按进容器中
ip link add veth-ns1 type veth peer name lxcbr0.1

# 把 veth-ns1 按到namespace ns1中,这样容器中就会有一个新的网卡了
ip link set veth-ns1 netns ns1

# 把容器里的 veth-ns1改名为 eth0 (容器外会冲突,容器内就不会了)
ip netns exec ns1  ip link set dev veth-ns1 name eth0

# 为容器中的网卡分配一个IP地址,并激活它
ip netns exec ns1 ifconfig eth0 192.168.10.11/24 up

# 上面我们把veth-ns1这个网卡按到了容器中,然后我们要把lxcbr0.1添加上网桥上
brctl addif lxcbr0 lxcbr0.1

# 为容器增加一个路由规则,让容器可以访问外面的网络
ip netns exec ns1     ip route add default via 192.168.10.1

# 在/etc/netns下创建network namespce名称为ns1的目录,
# 然后为这个namespace设置resolv.conf,这样,容器内就可以访问域名了
mkdir -p /etc/netns/ns1
echo "nameserver 8.8.8.8" > /etc/netns/ns1/resolv.conf

上面基本上就是 docker 网络的原理了,只不过,

了解了这些后,你甚至可以为正在运行的 docker 容器增加一个新的网卡:

1
2
3
4
5
6
7
ip link add peerA type veth peer name peerB
brctl addif docker0 peerA
ip link set peerA up
ip link set peerB netns ${container-pid}
ip netns exec ${container-pid} ip link set dev peerB name eth1
ip netns exec ${container-pid} ip link set eth1 up ;
ip netns exec ${container-pid} ip addr add ${ROUTEABLE_IP} dev eth1

上面的示例是我们为正在运行的 docker 容器,增加一个 eth1 的网卡,并给了一个静态的可被外部访问到的 IP 地址。

这个需要把外部的“物理网卡”配置成混杂模式,这样这个 eth1 网卡就会向外通过 ARP 协议发送自己的 Mac 地址,然后外部的交换机就会把到这个 IP 地址的包转到“物理网卡”上,因为是混杂模式,所以 eth1 就能收到相关的数据,一看,是自己的,那么就收到。这样,Docker 容器的网络就和外部通了。

当然,无论是 Docker 的 NAT 方式,还是混杂模式都会有性能上的问题,NAT 不用说了,存在一个转发的开销,混杂模式呢,网卡上收到的负载都会完全交给所有的虚拟网卡上,于是就算一个网卡上没有数据,但也会被其它网卡上的数据所影响。

这两种方式都不够完美,我们知道,真正解决这种网络问题需要使用 VLAN 技术,于是 Google 的同学们为 Linux 内核实现了一个IPVLAN 的驱动,这基本上就是为 Docker 量身定制的。

Namespace 文件

上面就是目前 Linux Namespace 的玩法。 现在,我来看一下其它的相关东西。

让我们运行一下上篇中的那个 mnt 的程序(也就是 PID Namespace 中那个 mount proc 的程序),然后不要退出。

1
2
3
$ sudo ./pid.mnt
Parent [ 4599] - start a container!
Container [    1] - inside the container!

我们到另一个 shell 中查看一下父子进程的 PID:

hchen@ubuntu:~$ pstree -p 4599
pid.mnt(4599)───bash(4600)

我们可以到 proc 下(/proc//ns)查看进程的各个 namespace 的 id(内核版本需要 3.8 以上)。

下面是父进程的:

1
2
3
4
5
6
7
8
hchen@ubuntu:~$ sudo ls -l /proc/4599/ns
total 0
lrwxrwxrwx 1 root root 0  4月  7 22:01 ipc -> ipc:[4026531839]
lrwxrwxrwx 1 root root 0  4月  7 22:01 mnt -> mnt:[4026531840]
lrwxrwxrwx 1 root root 0  4月  7 22:01 net -> net:[4026531956]
lrwxrwxrwx 1 root root 0  4月  7 22:01 pid -> pid:[4026531836]
lrwxrwxrwx 1 root root 0  4月  7 22:01 user -> user:[4026531837]
lrwxrwxrwx 1 root root 0  4月  7 22:01 uts -> uts:[4026531838]

下面是子进程的:

1
2
3
4
5
6
7
8
hchen@ubuntu:~$ sudo ls -l /proc/4600/ns
total 0
lrwxrwxrwx 1 root root 0  4月  7 22:01 ipc -> ipc:[4026531839]
lrwxrwxrwx 1 root root 0  4月  7 22:01 mnt -> mnt:[4026532520]
lrwxrwxrwx 1 root root 0  4月  7 22:01 net -> net:[4026531956]
lrwxrwxrwx 1 root root 0  4月  7 22:01 pid -> pid:[4026532522]
lrwxrwxrwx 1 root root 0  4月  7 22:01 user -> user:[4026531837]
lrwxrwxrwx 1 root root 0  4月  7 22:01 uts -> uts:[4026532521]

我们可以看到,其中的 ipc、net、user 是同一个 ID,而 mnt、pid、uts 都是不一样的。如果两个进程指向的 namespace 编号相同,就说明他们在同一个 namespace 下,否则则在不同 namespace 里面。这些文件还有另一个作用,那就是,一旦这些文件被打开,只要其 fd 被占用着,那么就算 PID 所属的所有进程都已经结束,创建的 namespace 也会一直存在。比如:我们可以通过:mount -bind /proc/4600/ns/uts ~/uts 来 hold 这个 namespace。

参考资料